

Looking to save money on your machined parts? Consider changing the design.
There are small changes that engineers can make to their part designs that will lead to big savings when it comes time to manufacture. Below, we’ve outlined some of the simplest and most common areas that are leading to excess time/cost in the machining process, as well as suggestions on designing parts with CNC machining in mind.
1. Don’t Over-Tolerance
Put simply, tighter tolerances lead to higher costs. If it isn’t necessary, don’t call for it.
While machining tight tolerances isn’t an issue for the manufacturer, it does require additional time in several areas of the production process (setup, machining, inspection, etc.) and in many instances, this is time being spent on non-critical part elements. Does that diameter really require +/-.001” to function properly, or could you open it up a bit? Being smart about tolerances in your part design is one of the best ways to save time and money when it comes to production.
2. Stick with Stock
All material (plate, bar stock, tubing, etc.) comes in standard sizes. Knowing these standard stock dimensions is key. Adjusting part design to fit within standard stock sizes will help limit waste and improve material yield. Consider thickness, width, diameter, length. All of these dimensions are standardized by most vendors.
(Example: Part A – .890” x 3.060” requires 1” x 3.5” material. With a small design change, Part A – .875” x 3.00” can be purchased as standard 7/8” x 3” stock. Saves on material costs and machine time.) While custom cuts/sizes are always available from suppliers, they are subject to higher costs and often minimum purchase prices.
3. Limit Pocket Depth
Deep cavities can be problematic when machining. They can result in chatter, tool deflection, and broken cutters. To remedy this, operators can rely on custom tooling and adjusted machining rates, but this adds to the final cost of a part.
To improve speed and quality, try to limit pocket depth to 2-3X tool diameter.
4. Add Internal Radii on Vertical Edges
End Mills and other cutting tools are generally round, which means they leave a radius in corners that have been machined. This radius should be factored into a parts’ design, especially on internal pocket corners.
Decreasing tool diameter will shrink this radius but won’t eliminate it entirely, and you can run into issues with vertical depth relative to tool size (see the previous tip.)
5. Avoid Thin Walls
Thin walls can be difficult to machine. The material can deflect from the cutting tool resulting in uneven dimensions or a sub-par surface finish. Machining thin walls can be achieved using multiple passes with less aggressive cuts, but these remedies increase the time it takes to machine a part which ultimately adds to production price.
Adding wall thickness to part design will help improve rigidity, and speed up machining time.
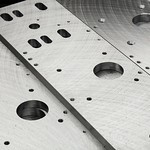
6. Avoid Small Features
Small holes, thin walls, and tiny pockets may look cool on a design, but they pose challenges when it comes time to machine. Often referred to as “micro-machining”, these intricate features require custom tooling, added machine time, and a more intensive inspection to ensure proper production without issues.
If efficiency and cost-savings are a priority, it is best to avoid small features when possible.
7. Standardize Everything
Taking the idea of using standard material stock from above, you can expand on this principle into all aspects of your parts design. When it comes to manufacturing, the more you can standardize the better.
Create your holes, slots, pockets based on standard drill sizes and end mill diameters. Choose your material based on most commonly stocked alloys. Dimension your drawings with standard machining tolerances.
Each of these steps better positions you for success in the machining process and will help save you time and money along the way.